You usually notice the problem at the worst moment. The clip is already shot, the deadline is close, and now the video is sideways, upside down, or locked in the wrong orientation for the platform you need to post on. The fast answer is a rotate button, but the best answer is choosing the right rotation method so you don't wreck quality, break a vertical layout, or create a file that looks fine in one app and wrong everywhere else.
How to rotate a video well comes down to three paths. You can flip orientation metadata when the player can read it, you can re-encode the file so the pixels themselves are rotated, or you can use a workflow tool that handles orientation as part of export. The difference sounds small, but it's the difference between a quick fix and an avoidable quality loss.
What Rotating a Video Actually Does to Your File
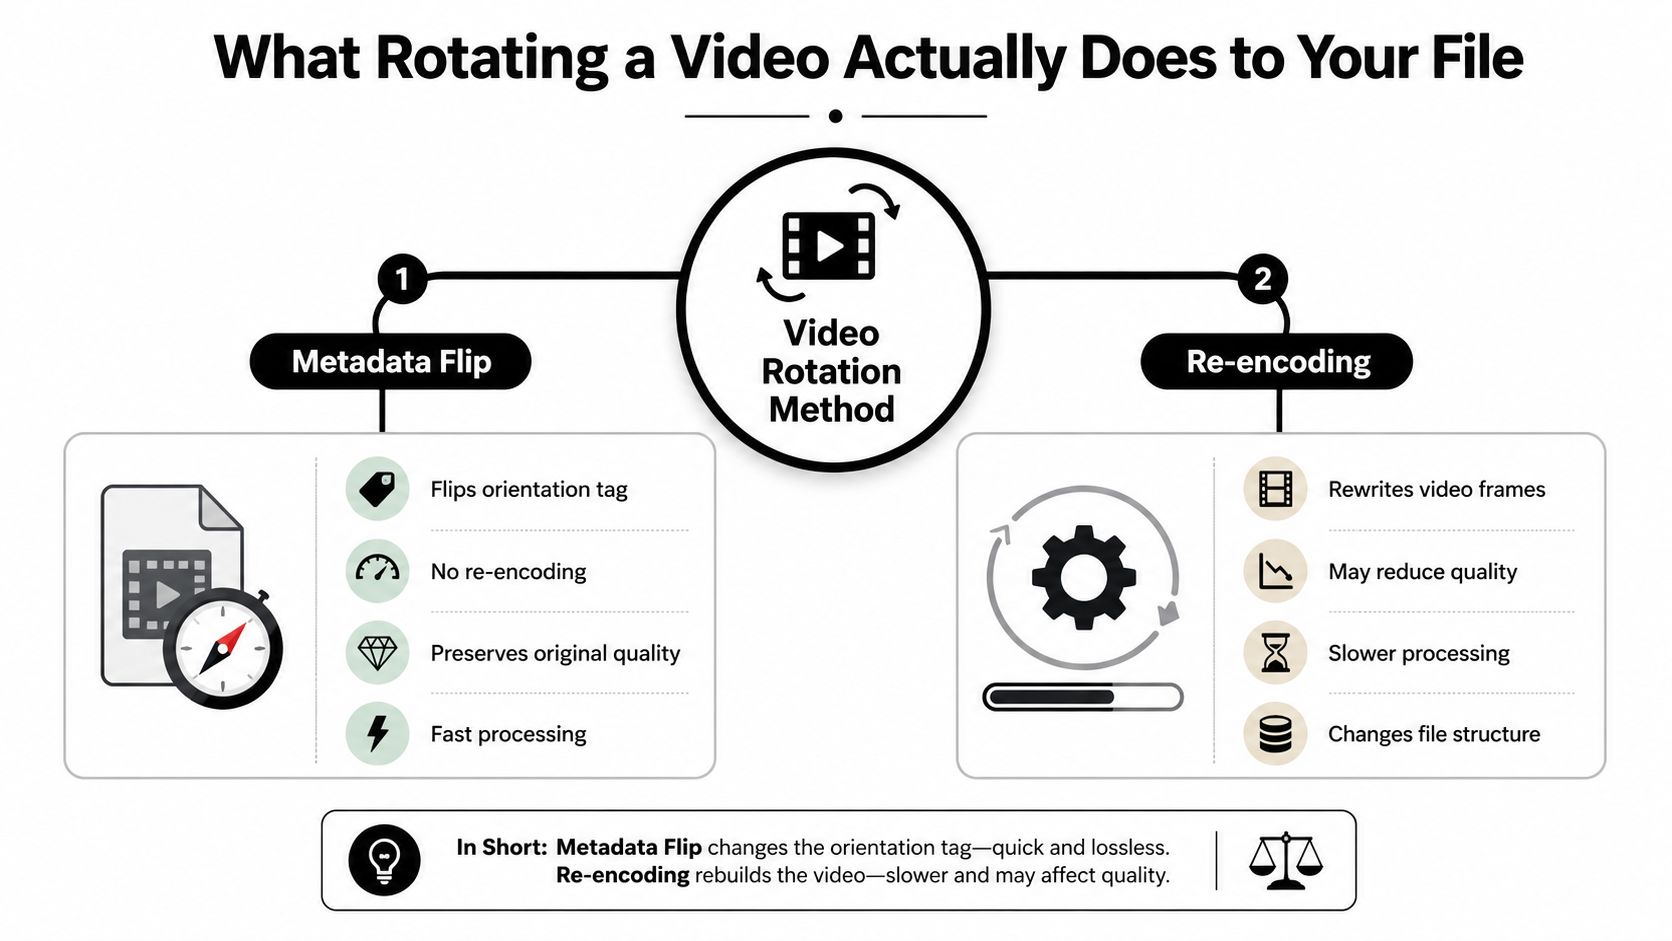
Rotation isn't one thing, it's a decision about how the file should change. A metadata flip changes the orientation tag, so the video player knows how to display the clip without rewriting every frame. A true rotation rewrites the pixels themselves, which means the file is processed again and may come out differently from the source.
Metadata rotation versus pixel rotation
If your app only changes orientation metadata, the result is usually fast and clean because the original image data stays intact. That matters when the footage is already sharp and you just need it to display correctly. It's also the kind of fix that often feels instant, because there's no need to rebuild the whole file.
A full re-encode is a different story. The editor has to read the clip, rotate the frames, and write a new version, which can introduce quality loss depending on the export settings. That's why some “rotate” buttons are harmless for a quick correction, while others force a new file with different compression.
Practical rule: If the app gives you a rotation option inside an export screen, assume it may re-encode unless the tool clearly says it's only changing metadata.
What to look for after export
The easiest sign of trouble is when the clip looks right in the editor but softer or heavier after download. Another warning sign is platform behavior. A clip can appear correct in your gallery and still upload sideways if the destination app ignores the orientation tag.
Microsoft's Clipchamp support shows both a freehand rotation tool that goes up to 360 degrees and a preset rotation option in 90-degree increments, and it also notes that multiple selected assets can be rotated together, which is useful when rotation is part of a broader edit rather than a one-off fix. The distinction maps cleanly to real editing work, because sometimes you need exact angle correction and sometimes you just need the file to face the right direction for mobile delivery. Microsoft's Clipchamp rotation guide makes that split explicit.
If you're converting phone footage before editing, keep the orientation question close to the format question. This guide to how to convert iPhone videos to MP-4 fits into the same pipeline, because conversion and rotation often happen back to back.
Rotating a Video on iPhone, Android, and Native Photo Apps
The fastest fix on a phone is usually the app already on the device. That's good news if you need a clip turned around quickly, but phone editors vary a lot in how they handle orientation. Some rotate the image cleanly, some write metadata that looks correct in the gallery but not everywhere else, and some only let you trim, which means you need a different tool.
iPhone and Apple Photos
On iPhone, the built-in Photos app is often enough for a simple rotate. Open the clip, tap Edit, then use the crop and rotate controls until the frame sits correctly. That's the best first stop for a clip that only needs a straightforward correction, especially if you're staying inside Apple's own ecosystem.
The catch is export behavior. A clip can look right in Photos, then play oddly in another app if the destination ignores the rotation metadata. When that happens, the fix isn't to keep tapping the same rotate control. It's to use an editor that writes the orientation into the file more explicitly.
Android, Google Photos, and stock gallery apps
On Android, Google Photos and many native gallery editors offer a rotate or crop tool inside the edit flow. The tap path is usually simple, open the video, hit Edit, then find the rotate control in the crop or adjust panel. On some devices, that's enough for a clean local correction.
Some gallery apps only give you trim and basic touch-up tools, not full rotation. If your stock editor can't change the frame direction, move straight to a third-party app instead of fighting the device.
The main gotcha is the same one phone editors keep running into. A clip can look fixed inside the gallery, then break when you upload to a platform that doesn't respect the tag. If you're posting to TikTok, Shorts, or Reels, test the upload behavior before you assume the phone edit is done.
For creators who need a quick second opinion on tool choice, it helps to compare how lightweight editors stack up before installing anything extra. A useful starting point is this guide to compare budget video editors, especially when the built-in app can't handle the exact rotation behavior you need.
Desktop Editors Worth Using for Rotation
Desktop editors make sense once rotation stops being a single correction and becomes part of a real timeline workflow. That's where trim, crop, color, and export presets live together, which matters if you're preparing content for short-form platforms or cleaning up multiple clips at once. The right choice depends on whether you need a simple snap rotation, a more controlled edit, or a batch workflow.
Quick comparison
| Editor | Rotation Modes | Batch Support | Re-encodes on Rotate |
|---|---|---|---|
| QuickTime on Mac | Simple rotate controls for quick correction | No | Usually yes, because it rewrites the file |
| Photos app on Windows | Basic rotate and crop behavior | No | Usually yes |
| iMovie | Standard rotation for timeline edits | Limited to project workflow | Usually yes |
| DaVinci Resolve | Manual rotation and transform controls | Yes, through timeline selection and duplication workflows | Yes, because it's a full editor |
| Adobe Premiere | Precise rotation and motion controls | Yes, within timeline workflows | Yes, as part of export |
That table reflects the practical reality of desktop editing. QuickTime is fine when you just need to turn a file around on Mac. Windows Photos is similarly useful for a one-off fix, but neither is built for a rotation-heavy content pipeline.
What each editor is good at
iMovie is the middle ground for Mac users. It's more flexible than a gallery app, but it still feels like a consumer editor rather than a finishing suite. DaVinci Resolve and Adobe Premiere are the serious tools when rotation has to live inside a larger edit, especially if you also need color work, timeline control, and platform-specific exports.
Rule of thumb: If the file needs more than a clean turn, use a real timeline editor. If it only needs the orientation corrected, don't spend twenty minutes inside a pro suite.
Clipchamp sits in a useful middle lane for browser-based desktop editing. Microsoft documents both freehand rotation up to 360 degrees and 90-degree snapping, and it also shows multi-selection rotation, which is handy when the rotation step belongs to a batch edit rather than a single clip. Microsoft's Clipchamp support page is one of the clearer references for how mainstream editors handle that workflow.
Online Tools for Rotating Without Installing Anything
Browser editors are the no-install route when you're on a borrowed laptop, fixing one clip, or avoiding a big desktop download. They're also the easiest way to understand the tradeoff between convenience and control, because most of them ask you to upload the file, edit it on the web, and download the result again. That round trip is simple, but it also means the file leaves your device.
What the workflow feels like
Most online tools follow the same pattern. Upload the video, rotate it in the browser, export, then download the result. That works well for a one-off sideways clip, but it's not the fastest path if you're rotating multiple assets or testing several versions for different platforms.
Clideo, Kapwing, and Clipchamp all sit in this general category, but they don't behave identically. Some run more of the work in the browser, while others rely on server-side processing. That affects how fast the export feels and how much trust you're placing in the platform with your source file.
Privacy and quality tradeoffs
If the file has to leave the device, treat privacy as part of the workflow, not an afterthought. That matters more for client footage, unreleased content, or anything you don't want moving through extra hands just to fix orientation. It also matters for quality, because many web tools re-encode by default.
If you need a no-install tool and you're still comparing options, the cleaner way to choose is by use case, not branding. A simple browser edit is fine for a quick social upload, while a repeat workflow is better handled by a dedicated editor or a script.
For creators who only need the cheapest practical path, it can help to compare editors by cost and feature set before you commit. That's where compare budget video editors becomes a useful reference point, especially if your rotate job is just one part of a larger post-production stack.
Rotating Videos from the Command Line with FFmpeg
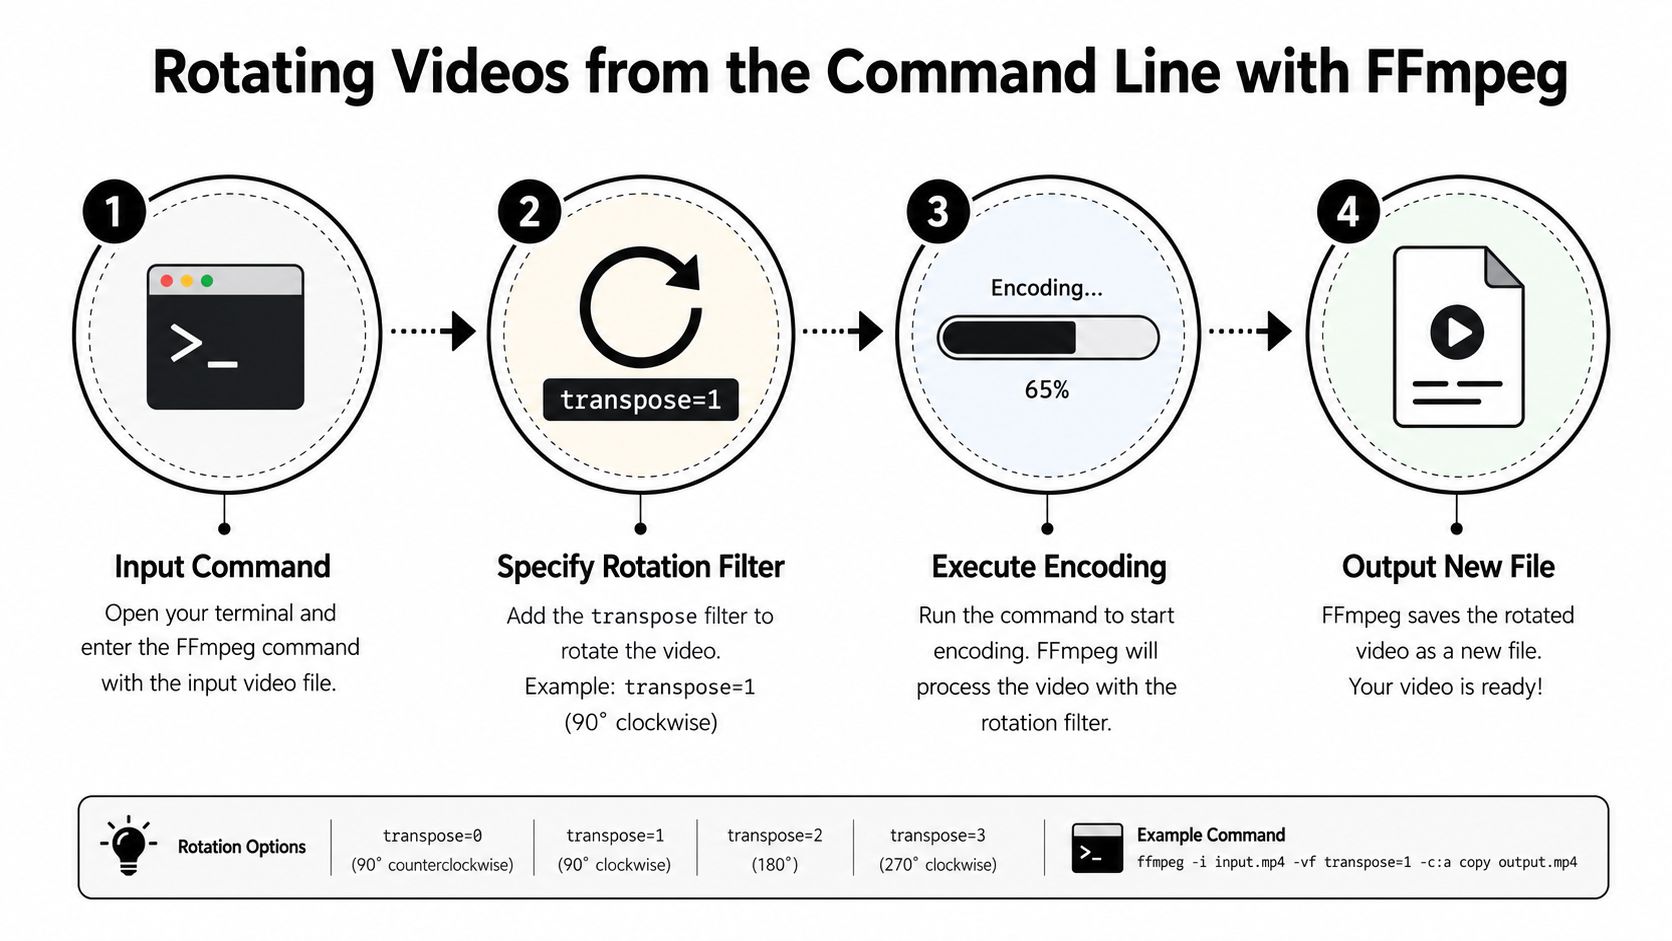
FFmpeg is the rotation tool for people who don't want to click through the same fix fifty times. It's built for scripting, batch jobs, and server-side processing, which is why it keeps showing up inside creator tools and automation pipelines. When rotation needs to be repeatable, FFmpeg is usually the cleanest answer.
The transpose shortcuts
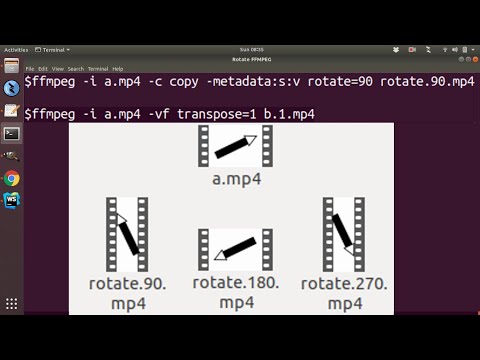
Cloudinary documents FFmpeg's transpose values clearly. transpose=1 rotates 90° clockwise, transpose=2 rotates 90° counter-clockwise, transpose=3 rotates 90° clockwise and flips vertically, and transpose=4 rotates 90° counter-clockwise and flips vertically. Cloudinary's FFmpeg rotation guide also shows the direct rotate=angle syntax, which is the path to arbitrary rotation when you need more than the built-in shortcuts.
A standard 90-degree correction looks like this:
ffmpeg -i input.mp4 -vf "transpose=1" output.mp4
For the opposite direction:
ffmpeg -i input.mp4 -vf "transpose=2" output.mp4
For a 180-degree turn, use the rotate filter or chain transformations depending on your pipeline. The important part is not the syntax alone, it's knowing that FFmpeg is comfortable with exact orientation work at the file level, which makes it practical for devices that recorded in the wrong direction.
Batch rotation and when FFmpeg wins
FFmpeg shines when you've got many files to fix. A folder of rotated clips can be processed in a script, which saves you from opening each one in a GUI editor and repeating the same clicks. That's the difference between a one-off correction and a pipeline.
Practical rule: Use FFmpeg when the same rotation problem keeps happening across lots of files. Use a GUI when you need visual control over framing, crop, or export.
If you're already joining clips or preparing outputs in bulk, this pairs naturally with how to join MP-4 files together, because rotation and stitching often live in the same processing chain.
Video
Rotation and Vertical Formats for Short-Form Platforms
Rotating a sideways clip and exporting it for TikTok, YouTube Shorts, or Instagram Reels are not the same job. A simple turn fixes the orientation of the footage, but a short-form export also has to fit a vertical frame cleanly. If you treat those as one problem, you end up with black bars, awkward crops, or a clip that looks technically correct and visually wrong.
Why black bars appear
Once you rotate a clip into a vertical timeline, the frame geometry changes. If the editor preserves the whole image, empty space has to go somewhere, and that's where black bars show up. If the editor fills the frame instead, the software has to crop more aggressively, which can cut off faces, captions, or the subject's hands.
That tradeoff is why mobile-first creators need to decide whether they're rotating and reframing, rotating and padding, or reshooting altogether. A sideways interview clip may survive a crop if the subject stays centered. A wide shot with text overlays often doesn't.
Decide before you export
For anyone building content around vertical posting, the export plan should match the intended feed. The vertical video dimensions guide is a useful companion when you're checking whether your frame fits the platform you're targeting. Sup Growth's 2026 TikTok video format is also handy context if you want a platform-specific view of aspect ratio expectations.
A simple decision tree usually works better than trial and error:
- Rotate and reframe when the subject stays readable inside a vertical crop.
- Rotate and pad when you need the full image but don't want to lose edges.
- Reshoot when the current framing can't survive the crop without looking amateurish.
That's the part most quick guides skip. They show the rotate button but not the framing consequence. In vertical video, the frame is the product, not just the container.
Batch Rotation and the Fastest Workflows for High-Volume Creators
The minute you start posting often, one-by-one rotation becomes a bottleneck. A single fix is easy. Ten clips, ten variations, or a recurring orientation problem across a content library is where manual editing starts wasting time. The fastest workflow is the one that matches volume, not the one that feels familiar.
Three ways high-volume creators handle it
In timeline editors, multi-select rotation is useful when several assets need the same correction. Microsoft's Clipchamp documentation explicitly notes that multiple selected assets can be rotated together, which is exactly the kind of batch behavior mainstream tools don't always advertise clearly. That's good enough for a small content set where you still want visual control.
FFmpeg is the better answer when the job repeats across folders. It doesn't care whether the files came from a phone, camera, or screen recording. If the rotation rule is the same every time, scripting wins because the command does the same thing every time.
Template-based automation sits at the other end of the spectrum. That's where orientation gets handled as part of creation instead of correction. ClipCreator.ai fits there, because it builds short-form videos for TikTok, YouTube, and Instagram and handles orientation as part of the output flow rather than making you fix every clip afterward.
For creators thinking about volume, YouTube growth tips can help frame why speed matters. The more often you publish, the less sense it makes to treat rotation as a manual exception every single time.
What to use when
Use a manual editor when the framing still needs judgment. Use FFmpeg when the same correction keeps repeating. Use automation when the content system itself should avoid the rotation step.
That's the cleanest way to think about how to rotate a video without slowing down a channel. The tool choice is not about status, it's about how many files you'll touch before the day is over.
If you want rotation to stop being a separate chore, build it into the workflow instead of fixing it after export. ClipCreator.ai creates short-form videos for TikTok, YouTube, and Instagram with orientation handled in the generation process, so you're not reopening files just to turn them around. Visit ClipCreator.ai if you want a system that treats rotation, vertical formatting, and publishing as one pipeline instead of three separate tasks.

Create your first video in under 2 minutes
Pick a niche, and ClipCreator.ai generates and auto-posts faceless videos to your channels every day.
Join ClipCreator.ai